When you’re looking to install a clean, durable, and low-maintenance fence, aluminium is often one of the top choices. If you’re reading this, you’re likely wondering: how to install aluminium fencing properly. Should you try DIY aluminium fence installation or get a professional aluminium fence install? What are the step-by-step procedures, and what hidden challenges might you face?
In this post, I’ll walk you through both paths—DIY and professional—in clear, conversational language. You’ll get a hands-on aluminium fencing installation guide, covering everything from site preparation and post foundations to gate installation, finishing touches, costs, maintenance, and regulatory compliance.
By the time you finish this article, you’ll be equipped to evaluate quotes, decide whether to DIY or hire, and follow a reliable method so your fence lasts for decades.
Why Choose Aluminium Fencing?

Before you jump into the “how,” it’s worth understanding why aluminium often makes sense as a fencing material. That will help you appreciate some of the design decisions you’ll make along the way.
-
Resistance to rust / corrosion – Aluminium forms a passive oxide layer that resists corrosion. With quality powder-coated finishes, it performs well in varying climates.
-
Lightweight but structurally strong – Because the metal is relatively light, handling and cutting are easier than steel, yet proper extrusions give rigidity.
-
Low maintenance – You won’t need to re-stain, paint, or seal regularly; usually, a wash now and then is enough.
-
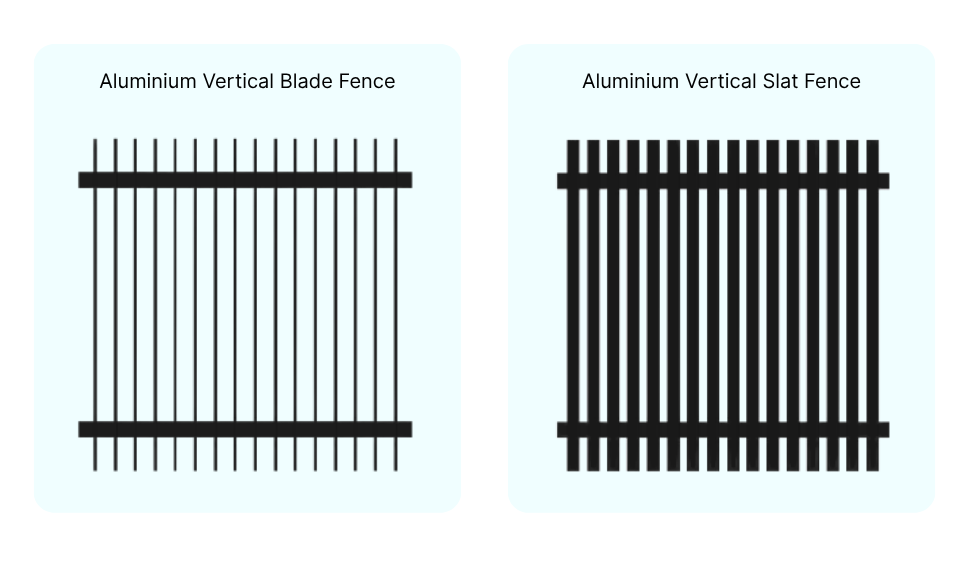
Aesthetic flexibility – You can find slat / louvre / blade profiles, various powder-coat colors, “wood-look” finishes, and custom spacing.
-
Longevity & lifecycle value – It may cost more upfront than cheaper materials, but a well-installed aluminium fence can easily last 25+ years.
-
Non-combustible / fire-safe in many cases – Especially relevant in bushfire-prone regions.
-
Recyclable – At end-of-life, aluminium is highly recyclable, supporting sustainability.
Because of these traits, aluminium tends to outperform options like timber (which need regular upkeep) or cheaper metals prone to rust, especially in Australia’s climate.
With that context, let’s dive into the practical side: how to install aluminium fencing.
DIY vs Professional Aluminium Fence Installation

One of the first decisions you’ll face is whether to do a DIY aluminium fence installation or hire someone for a professional aluminium fence install. Each has merits, drawbacks, and cost implications.
Pros & Cons of DIY Aluminium Fencing
Pros:
-
Cost savings — Labour is typically a big chunk of quotes; DIY removes that markup.
-
Control & flexibility — You set the pace, make adjustments as you prefer, and see every detail.
-
Learning & satisfaction — Doing it yourself offers a sense of mastery and satisfaction.
-
Avoiding contractor delays — You’re not at the mercy of availability, weather delays, or crew scheduling.
Cons:
-
Time & effort required — Fencing is hard manual work (digging, lifting, leveling).
-
Risk of mistakes — Errors in alignment, leveling, anchor design, or gate installation can ruin the outcome or void warranties.
-
Permit & compliance burden — You must ensure local council rules, boundary rights, safety / structural requirements.
-
Tools & materials upfront cost — If you don’t already own key tools, buying them can reduce savings.
-
Warranty issues — Some material warranties may require professional aluminium fence install to remain valid.
In short: for shorter fence runs, relatively flat ground, and confident DIYers, DIY can be great. For steep slopes, complex alignment, heavy wind loads, or long runs, a professional install often pays off in quality, time, and peace of mind.
What a Professional Aluminium Fence Installer Provides
A reputable contractor will typically:
-
Survey the site, check levels, slopes, soil conditions
-
Handle design, engineering input for wind loads or spans
-
Manage permit applications or council approvals
-
Accurately set posts (holes or baseplates)
-
Perform racking or stepping on slopes
-
Ensure perfect alignment, squaring, and gate functions
-
Provide warranty, liability, and often maintenance guarantees
-
Handle cleanup, waste removal, and final touch-ups
Essentially, a professional takes on the complexity and risk; you pay for that assurance.
Cost Comparison (DIY vs Professional) in 2025 (Australia)
Here are some benchmark numbers you may see in Australia:
-
Typical labour cost for fencing in Australia is $65–$110 per metre depending on location, terrain, and complexity.
-
For aluminium fences, some guides cite supply and install costs between $100 and $650 per linear metre, depending on style, site difficulty, gate elements, etc.
-
Other sources advertise aluminium fence prices between $80 and $200 per metre for standard profiles.
-
A local estimate: powder-coated aluminium slat screens often cost $95–$155 per square metre (related to surface area).
So, for a simple straight run of 20 m using standard slat fencing, labour might add ~$1,300–$2,200 (at $65–110/m) plus materials. If DIY, you’d only pay the materials + tool costs—but allow yourself extra contingency (say 10–20%) for waste, mistakes, and unexpected issues.
When quoting, always ask your contractor for a breakdown: materials, labour, waste, site prep, gates, extra drainage or retaining.
You can find a detailed breakdown of aluminium costs in this guide: [Updated 2025] How Much Does Aluminium Fencing Cost?
Pre-Installation: Planning, Tools & Material Checklist
1. Planning Your Fence Layout
-
Confirm property boundaries to avoid disputes.
-
Mark utilities—call before digging.
-
Sketch your layout, including gates and corner posts.
-
Measure post spacing according to your panel width.
-
Plan for slopes—decide on racking (tilting) or stepping (level drops).
2. Materials & Tools Needed for Aluminium Fence Installation
Whether you DIY or supervise a contractor, you should know the core components and tools for a successful aluminium fence installation.
Core Materials & Components
-
Aluminium fence panels / slat panels / blade infills / pickets
-
Aluminium posts (hollow square, round, or custom extrusions)
-
F-section brackets / receiving rails (for slats to slide into)
-
Mounting brackets / post-to-rail connectors / base plates
-
Concrete / cement (for embedding posts)
-
Gravel / crushed rock (for drainage in base)
-
Fasteners / tek screws / stainless steel screws
-
Gate hardware (hinges, latch, drop bolts, gate frame)
-
Post caps / end caps
-
Spacers / packers (to maintain even gap between slats)
-
Silicone / sealant (if needed)
-
Protective coating (touch-up paint, anti-seize lubricant)
Essential Tools
-
Tape measure, chalk line / string line
-
Spirit level / laser level
-
Post hole digger / auger
-
Shovel, spade
-
Circular saw / chop saw with aluminium cutting blade
-
Drill / driver with bits for aluminium / masonry
-
Adjustable wrenches, socket set
-
Mallet (rubber or nylon)
-
Clamps
-
Carpenter’s square
-
Safety gear: gloves, eye protection, hearing protection
-
Masonry mixing tools or concrete mixer
-
Marking spray paint
-
Sawhorses / workbench
Having all your tools handy before starting will avoid delays during the installation.
3. How to Prepare the Ground and Site Before Installing Aluminium Fencing

Preparation is 70% of a good fence job. If the ground is sloppy, soggy, rocky, or filled with obstructions, even the best materials won’t save you. Here’s how to set things up for success.
Step 1: Clear, Measure & Mark Out
-
Remove vegetation, rocks, old fencing, debris, roots or stumps in the fence line.
-
Using stakes and string line, define your fence alignment. Use a line and ensure it’s tight, straight, and level relative to your desired finish height.
-
Use your panel widths to mark post centers—maintaining consistent spacing.
-
Check boundary lines—survey or confirm your legal boundary before erecting anything.
Step 2: Check Levels, Slopes & Terrain
-
Walk the line and identify slope changes, dips, rise, or obstacles.
-
You’ll need to decide whether to rack (tilt panels slightly) or step (vertical panels with small level changes) over slopes.
-
Plan extra posts (or shorter spans) where slopes are steep or ground falls heavily.
-
Consider drainage: avoid creating a dam by your fence.
Step 3: Dig Post Holes / Prepare Baseplates
-
For in-ground posts: typical 600 mm deep × 200 mm wide hole is a common guideline (check local soil conditions).
-
If using base plate mounting (on concrete pad or slab), then mark and drill anchor bolt holes.
-
Place gravel (say 50–100 mm) at the base for drainage and compaction.
-
For uneven terrain, use a raking jig or packers to tilt brackets.
Tip: Always dig holes one at a time, set the post, pour concrete, and let it cure before moving to the next, rather than staging all holes and installing later.
Soil & Foundation Notes
-
In sandy or loose soil, you may need deeper or bigger posts or reinforcing rods.
-
If your ground has rock or requires jackhammering, be prepared for extra time or cost.
-
For coastal or salty air areas, use concrete with corrosion inhibitors or specialty mix to prolong life.
Once your holes or baseplates are ready, you can proceed to putting up the posts.
Foundation & Post Installation

This is a critical phase: if your posts aren’t plumb, square, and solid, the rest of the fence will suffer.
Setting Posts In Ground (Embedment Method)
-
Place the post in the hole, aligned to the string line, and level in both vertical axes.
-
Temporarily brace the post using timber stakes or supports to maintain position.
-
Pour concrete mix (fast-setting or standard), filling the hole to about 25–30 mm below grade.
-
Tamp / vibrate the concrete to remove voids, ensuring good contact with soil.
-
Slope the top of the concrete slightly away from the post to shed water.
-
Cure for at least 24 hours (or per concrete spec) before loading.
Dimension suggestions: ~100 mm cover around the post, hole width ~3× post width.
Base Plate / Surface Mounting (If Using Slab or Concrete Pad)
-
Align the post with the string, level it with shims or packers.
-
Drill anchor bolt holes into the slab.
-
Use epoxy-anchored bolts or mechanical anchor bolts per spec.
-
Use a high-quality grout or bedding compound under the base plate for full contact.
Surface mounting is trickier for structural fences, as the base plate can be a weak point in wind loading—consult specifications or an engineer if spanning long distances.
Embed Depth / Post Height
-
A general rule: use at least 1/3 of the post height for embedment (i.e. a 1.8 m fence might embed 600 mm).
-
Add margin for frost, soil shifting, shrink-swell.
-
Leave ~25 mm above panel height to allow for post cap clearance.
Once posts are firmly in place, check each for plumb again before proceeding.
Panel & Slat Attachment
With the posts in place and cured, you can begin connecting the panels or installing slats. The exact method depends on your system (prefabricated panels, custom slats, etc.).
Once the posts cure, it’s time to attach your panels or slats.
Step-by-Step: Attaching Aluminium Slats to Rails Correctly
Many aluminium slat fencing systems use an “F-section” bracket or channel that slides into or along the panels. A published installation guide suggests:
-
Screw the F-section (mounting rail) to one post end only (top and bottom).
-
Slide or pivot the panel/slats into that F-section.
-
Attach the opposite F-section to the other post end, pivoting/sliding the panel into place.
-
Once height is confirmed, fasten the rails to both posts (top and bottom).
-
Add any intermediate rails or mid-rails if the panel system requires them.
-
Use spacers / packers to ensure consistent slat gap while tightening.
-
Repeat for additional sections.
-
After all panels are in, install post caps.
This “pivot-then-lock” method helps with alignment and reduces force.
Dealing with Slopes: Racking vs Stepping
When your ground isn’t level:
-
Racking (continuous tilt): The fence panels gradually tilt, matching the slope at a slight angle. Works well for mild gradients and when your system supports racking.
-
Stepping (level panels, drop in steps): Each panel is installed level, but there is a vertical “step” down/up between adjacent panels. This is simpler for steeper slopes.
-
Combination approach: Racking for mild slope sections and stepping for sharper changes.
Your fence system and bracket design often limit how much rake (tilt) is possible—check the manufacturer spec. Over-tilting can weaken structural geometry or create gaps.
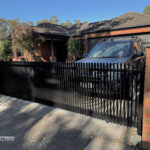
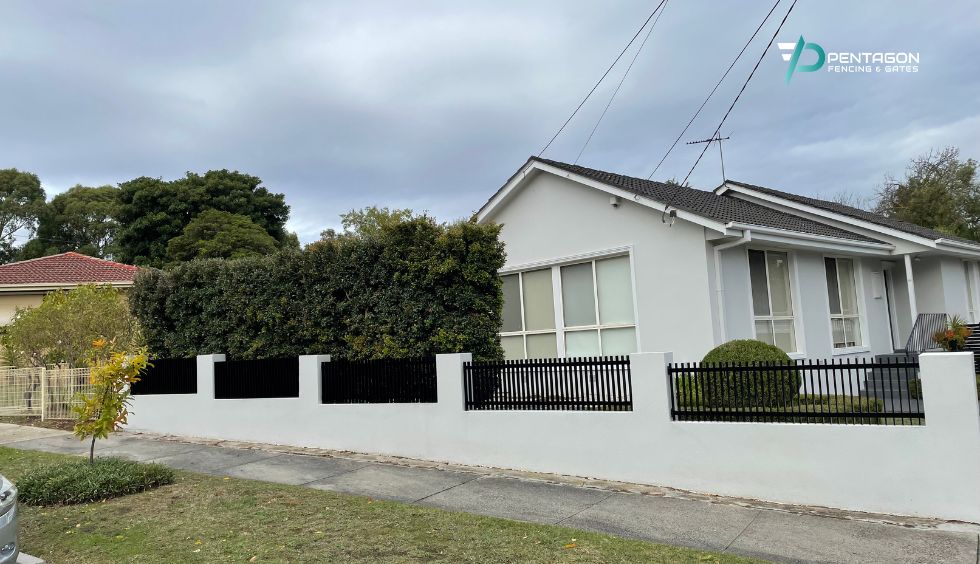
Gate & Opening Installation
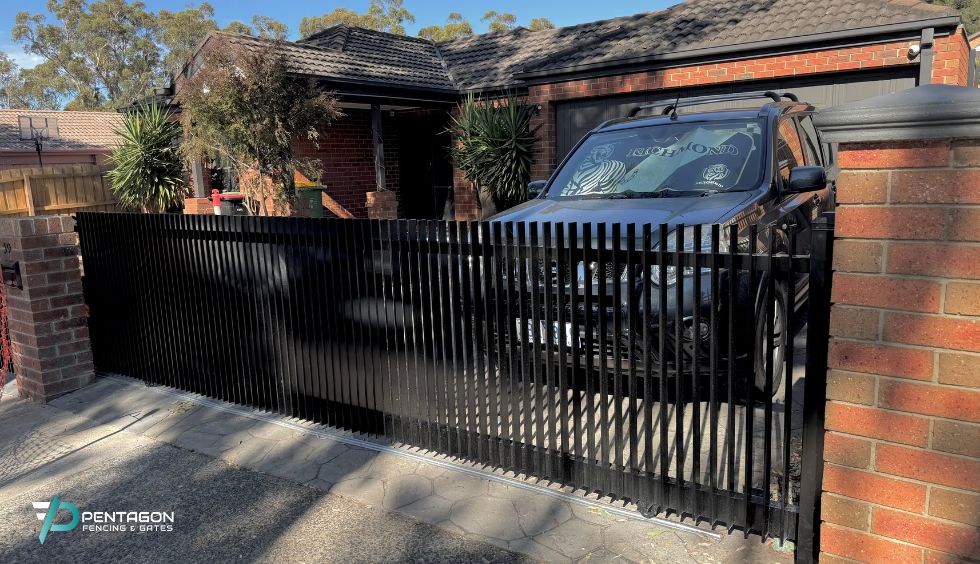
Any aluminium fencing job is incomplete without a gate. Here’s how to install an aluminium gate on fence line:
-
Install your gate posts early—these are stronger, sometimes concrete-filled, or reinforced.
-
Leave the correct clearance (often 25 mm above bottom of gate to finish grade).
-
Mount hinges: start by placing the top and bottom hinge lightly (just a single screw to allow adjustment).
-
Use levels to adjust swing, tightness, and plumb, before fixing all hinge screws.
-
Install latch hardware and test locking / alignment.
-
Install drop bolts or astragals if it’s a double gate.
-
Adjust as needed after posts settle or minor movement occurs.
Take your time on the gate—poor gate alignment is one of the most visible flaws.
Finishing & Quality Checks
Now it’s time for the fine work—make sure everything is square, clean, and durable.
Alignment, Squaring & Fastening
-
Walk along the fence and check top line, bottom line, and panel transitions for continuity.
-
Use a long straight edge (or string) to see if any panels bow.
-
Tighten all fasteners, but do so carefully—over-torquing can deform aluminium.
-
Check each post is still plumb after fastening adjacent panels.
-
Check panel gaps, slat spacing, and consistency.
-
Use end caps or post caps, gently tamped with a mallet, to finish off appearance.
-
Clean off metal shavings or filings immediately to avoid corrosion spots.
Inspection & Adjustments
-
Open and close gates several times, checking for catch, drag, or glitch.
-
Check for any contact points (slats rubbing, brackets touching).
-
Confirm that drainage will flow away from the fence base (not toward it).
-
Check final height and finish line.
-
Correct any deviations early—fixing later is harder.
Once you’re satisfied, rinse off the fence with water (remove dust, dirt) and your installation is done!
Special Conditions: Slopes, Racking, and Uneven Ground
Australia isn’t exactly flat, and few Melbourne backyards are perfectly level. That’s where installing aluminium fencing on sloped ground (racking vs stepping) comes in.
-
Racking method: Panels are tilted slightly to match gentle slopes. It looks seamless and works well for gradients up to 10°.
-
Stepping method: Each panel remains level, but the posts “step down” the slope. Best for steep or irregular terrain.
-
Hybrid method: Rack where possible, step where necessary.
Always confirm your system’s allowable rake angle—some prefabricated panels can only rack 10–15°, beyond which they distort.
If your ground is uneven or rocky, shorten panels or add intermediate posts for better alignment and stability.
Maintenance & Longevity Tips After Installation
Even though aluminium fencing is low-maintenance, some care helps it last longer and look better.
-
Periodic cleaning – once or twice a year with mild soap, water, soft brush or rag (avoid harsh abrasives).
-
Inspect for damages – check fasteners, brackets, welds, connections, and gate hardware.
-
Re-touch coating – small nicks or chips should be touched up with manufacturer-supplied paint or anodising spray.
-
Lubricate hinges – a little silicone spray keeps gates smooth.
-
Check for soil movement – shifting ground can cause misalignment.
-
Avoid planting invasive vines – roots may push on posts or attach to slats.
-
Keep weed/gravel clear – don’t allow fill or mulch to touch the bottom rail (can trap moisture).
-
Winter/Storm checks – after heavy wind or storms, inspect for loose components.
With minimal effort, a good aluminium fence can stay strong and pretty for decades.
Challenges, Common Mistakes & Tips for Aluminium Fence Installation
Even seemingly simple fence jobs can run into surprises. Here are common pitfalls and how to avoid them.
Frequent Mistakes
-
Posts not deep or wide enough → sagging or leaning.
-
Poor alignment or string-line setup → crooked fence.
-
Over-tilting (racking too much) beyond system capacity.
-
Failing to brace gate posts properly → gate sag.
-
Using wrong fasteners (e.g. carbon steel that corrodes).
-
Not cleaning metal shavings → corrosion spots.
-
Ignoring local regulations or boundaries → disputes or forced rebuilds.
-
Starting panel installation before concrete cures fully.
-
Trying to force panels to fit instead of adjusting post spacing.
Tips & Best Practices
-
Always start with the gate when laying your first post reference—gate geometry often dictates the rest.
-
Check plumb & alignment at every stage—not just at the end.
-
When mixing suppliers or imperfections, test-fit one panel before concreting all posts.
-
Use stainless or galvanised fasteners to avoid corrosion.
-
In high-wind zones, reduce panel spans or reinforce posts.
-
On sloping terrain, plan extra posts or steps.
-
Keep record photos during progress—useful if issues arise.
-
Label panels and parts during delivery—makes installation faster.
Regulatory & Compliance Considerations
Any decent installation must respect local rules, standards, and safety requirements.
-
Building permits & council approvals — many local councils require you to lodge plans or get permits if fences exceed certain heights or are structural.
-
Boundary fencing rules — check your legal boundary, fence line agreements with neighbors, cost-sharing, party-wall rules.
-
Fence height limits / setbacks — some zones restrict fence height or require fences to step down behind front setback lines.
-
Bushfire / fire ratings — in fire-prone areas, your fence materials/methods may need compliance (non-combustibility, spacing, etc.).
-
Pool fencing / safety fences — if your fencing is used to enclose a pool, special standards apply (height, gaps, self-closing gates).
-
Wind load / engineering — for longer spans, high walls, or windy zones, a structural engineer might need to certify post spacing or reinforcement.
-
Material safety standards — ensure your aluminium, powder-coating, fasteners, and treatments meet Australian or relevant standards.
Always check with your local council or a building surveyor before proceeding—it’s far cheaper than retrofitting or demolition later.
Aluminium Fencing Cost & Budget Guide (2025 Australian Context)
Let’s break down the key cost drivers and budgeting factors for 2025.
| Component | Average Cost Range (AUD per metre) |
|---|---|
| Standard slat or panel (materials only) | $80 – $200 |
| Powder-coated decorative panels | $150 – $300 |
| Labour for professional installation | $65 – $110 |
| Gate & hardware | $300 – $1,200 + |
| Permit or council fees | $50 – $200 typical |
If you’re comparing DIY vs professional aluminium fence installation cost 2025, assume:
-
DIY: $2,000–$3,000 for 20 m fence (materials + tools)
-
Professional: $4,000–$5,500 for the same length (labour included)
Budget an extra 10–15 % for contingencies like slope adjustments, rocky soil, or last-minute hardware.
Budget tip: Request at least 3 reliable quotes and ask for separate line-items (materials, labour, groundwork, extras) so you can compare apples to apples.
Which Method Should You Choose?
Here’s a quick decision logic:
-
Choose DIY if your fence run is modest (< 30 m), site is level, you have intermediate handy skills, and you want to save cost.
-
Hire a professional for long spans, steep slopes, coastal or wind zones, complex gates, or if you want guaranteed quality and peace of mind.
-
Hybrid: you might do site prep yourself (clearing, digging holes) and hire a contractor for setting posts and alignment, or supervise a builder but perform the finishing touches.
Even if you start DIY, consider getting at least one professional quote—it gives perspective and may highlight complexities you hadn’t foreseen.
FAQ / Common Questions
Q: Do I need a permit to install aluminium fencing?
Usually not for side or rear boundaries under 2 m, but front fences or pool barriers may require council approval. Always confirm local rules before digging.
Q: How long does installation take?
For DIYers, a 20 m fence may take 2–3 days including concrete curing. Professionals often complete it in a single day with a full crew.
Q: Can I install on rocky or compacted soil?
Yes, but you’ll need special masonry bits, a jackhammer or core drill, and possibly chem-set anchors instead of traditional concrete footings.
Q: What warranty is typical for an installed aluminium fence?
Material warranties usually span 10–20 years for powder-coated aluminium. Professional installers often add 1–3 years workmanship warranty on top.
Q: How deep to set aluminium fence posts in concrete?
A: A common rule is ~600 mm (i.e. 60 cm) deep for standard residential posts (hole ~200 mm wide), especially for a 1.8 m fence.
Adjust for soil type, freeze depth, or heavy wind zones.
Q: What tools are needed for aluminum fence installation?
See the Tools & Materials section above—key ones include drill, post hole digger, level, saw with aluminium blade, string line, mallet, and fasteners.
Q: How to install aluminum fence on a sloped ground (racking vs stepping)?
Use racking when slopes are gentle and your panel system allows slight tilt. For steeper or uneven ground, step with level panels in discrete drops. Use extra posts for severe slopes.
Q: How to attach aluminium slats to rails correctly?
Use the “F-section bracket / channel” method: screw to one post, then pivot or slide the panel into place, then screw the other end. Use packers and spacers to maintain even gaps.
Q: How to install an aluminum gate in the fence line?
Install reinforced gate posts first, set hinge hardware loosely, adjust for plumb and swing, affix hinges fully, install latch, test alignment repeatedly.
Q: What are the best methods to anchor aluminium fence posts?
Embedment in concrete (600 mm deep × 200 mm wide) is common. For slab mounting, use base plates with epoxy or mechanical anchors, plus grout for full contact.
Q: How to check fence panels alignment and level?
Use a taut string line, long straight-edge, laser level or spirit levels across panels. Walk the full length, spot bis, deviations, and correct before tightening.
Q: What are maintenance tips for aluminum fencing after installation?
Periodic cleaning, inspect fasteners, re-touch coating, lubricate hinges, check for shifting ground, and avoid debris buildup at base.
Final Thoughts & Next Steps
Installing an aluminium fence—whether by your own hand or by hiring a pro—is a worthwhile investment in durability, aesthetics, and long-term peace of mind. With this aluminium fencing installation guide, you’ve got a roadmap: from choosing DIY or professional, understanding tools, walking through each step (site prep, post installation, slats, gates), to finishing and maintenance.
Before you begin:
-
Check your local council / building rules
-
Get multiple quotes to benchmark cost
-
Plan your layout carefully, especially regarding slopes, gates, drainage
-
Ensure you have or borrow the right tools
-
Take your time with alignment, plumb, and leveling—these decisions stick
-
Document (photos, notes) your progress in case you need recourse
If you like, I can also build you a customized checklist or downloadable worksheet tailored to Melbourne or your suburb. Want me to generate that for your location?
Find a Professional Aluminium Fencing Contractor Near You in Melbourne

If you’re in Melbourne and prefer a professional touch, Pentagon Fencing & Gates offers complete aluminium fencing installation services — from custom design and supply to expert on-site fitting. Our team specialises in aluminium slat, blade, and decorative fencing, with seamless integration for driveways, carports, and gates. Every project is handled by licensed installers who understand local soil, slope, and council regulations, ensuring long-lasting strength and flawless finish.
Whether you want a simple boundary fence or a fully automated aluminium gate system, Pentagon Fencing & Gates can provide a free quote, professional advice, and a finish that complements your property’s architecture.
Contact us today to schedule a site visit or request a personalised quote for your aluminium fence installation in Melbourne.